Q2
Q2
 QIDI Box
 Plus 4
 Q1 Pro
 X-Max 3


Infill in 3D Printing: What It Is and Why It Matters

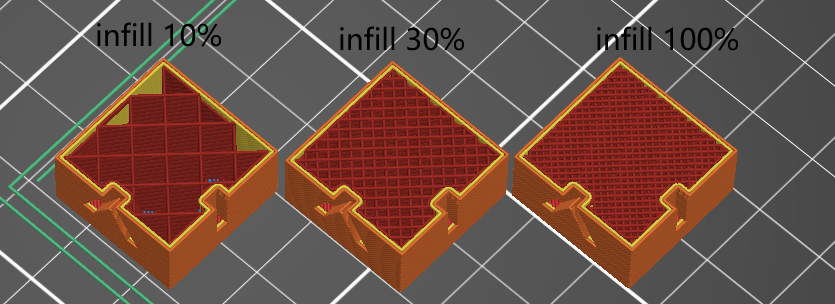
Use 15–20% gyroid or grid for most prints and reserve 40–60% for parts that carry load. In controlled testing at 60% infill in PLA, grid reached 21.91 MPa ultimate tensile strength against 13.05 MPa for adaptive cubic — a 68% spread from pattern choice alone, before density enters the picture.
What Is Infill in 3D Printing?
Infill is the repeating internal lattice a slicer generates between the outer walls of a 3D print, expressed as a percentage of the interior volume that gets filled with material. At 0% the part is hollow; at 100% it is solid. Everything interesting happens between those two numbers.
Infill does three jobs at once, and they pull in different directions. It supports the top layers so they have something to bridge across. It carries internal load and distributes stress between the walls. And it consumes filament and print time in direct proportion to how much of it you ask for. Every infill decision is a trade between those three, which is why there is no single correct setting — only a correct setting for a given part.
| Interior strategy | Material use | Print time | Structural behavior | When it makes sense |
|---|---|---|---|---|
| Hollow (0%) | Lowest | Fastest | Top layers cannot bridge; walls buckle under point load | Vase-mode prints and shells that carry no load |
| Sparse infill (10–25%) | Low | Fast | Supports top surfaces; limited load capacity | Display models, prototypes, large decorative parts |
| Medium infill (30–60%) | Moderate | Moderate | Meaningful stiffness and load capacity | Brackets, jigs, enclosures, most functional parts |
| Solid (100%) | Highest | Slowest | Maximum strength; most brittle fracture behavior | Thin parts and small high-stress components only |
Which Infill Pattern Is Strongest?
Grid produced the highest ultimate tensile strength of the four patterns compared under identical conditions in a 2025 study in Polymers, at 21.91 ± 0.61 MPa, followed by honeycomb at 18.42 ± 0.77 MPa, rectilinear at 16.65 ± 0.20 MPa, and adaptive cubic at 13.05 ± 0.58 MPa. The specimens were PLA printed at 60% infill, 0.2 mm layer height and three wall loops, with three replicates per pattern.
| Pattern | Geometry | Tensile strength, PLA at 60% infill | Material vs rectilinear | Print time vs rectilinear | Pick it for |
|---|---|---|---|---|---|
| Grid | 2D, lines cross each layer | 21.91 ± 0.61 MPa | Comparable | Comparable (fast) | Peak tensile capacity, general-purpose parts |
| Honeycomb | 2D hexagonal cells, no path crossings | 18.42 ± 0.77 MPa | ~25% more | Up to 2x longer | Stiffness and compression; highest Young's modulus of the four |
| Rectilinear | 2D, parallel lines alternating per layer | 16.65 ± 0.20 MPa | Baseline | Baseline (fastest) | Drafts, and the only pattern recommended at 100% infill |
| Adaptive cubic | 3D, density varies with wall distance | 13.05 ± 0.58 MPa | ~25% less | Shorter | Large hollow prints where top-layer support is the only requirement |
| Gyroid | 3D, continuous non-crossing surface | Not in this test set | Moderate | Relatively fast for a 3D pattern | Near-equal strength in all three axes; flexible filaments |
| Triangles | 2D, three-way crossings per layer | Not in this test set | Similar to grid | Almost identical to grid | Multi-directional in-plane loading |
Tensile strength figures are from Alzahrani et al., a comprehensive investigation of infill geometry effects. Material and time comparisons are from the Prusa slicer documentation.
Now the part most infill guides leave out: pattern rankings do not transfer between load cases, and the published literature does not agree on a universal winner. A separate 2022 study in Materials tested PLA to ASTM D638 Type IV at 0.18 mm layer height and found hexagonal infill at 13.79 MPa against gyroid at 8.56 MPa — a different absolute scale and a different ordering from the study above, because the specimen geometry, layer height and wall configuration were different.
That disagreement is the finding, not a flaw in the data. Infill pattern strength is not a material property. It is a property of the pattern, the density, the wall count, the layer height and the direction you load the part. Treat any single ranked list, including the table above, as valid for the conditions it was measured under.
Which Pattern Is Stiffest Under Bending?
Honeycomb and triangular structures resist bending roughly three to four times better than grid at the same material volume. A study of PLA beams measuring 120 mm by 20 by 20 mm, built with 3 mm cells and 1 mm cell walls, put the three patterns through symmetric three-point bending and asymmetric cantilever loading. The numbers below are force-deflection tangent ratios, where lower means stiffer.
| Pattern | Specimen volume | Material vs hexagonal | Deflection ratio, Y axis | Deflection ratio, Z axis | Directional consistency |
|---|---|---|---|---|---|
| Triangular | 26,468.87 mm³ | +23.96% | 0.0066 | 0.0080 | 0.95 (consistent) |
| Hexagonal (honeycomb) | 21,353.07 mm³ | baseline | 0.0095 | 0.0114 | 1.02 (consistent) |
| Grid | 20,964.76 mm³ | −1.82% | 0.0303 | 0.0450 | 0.64 (strongly anisotropic) |
Read the grid row against the hexagonal row. Grid used 1.82% less material and deflected 3.94 times further on the Z axis and 3.18 times further on the Y axis. That is not a material-efficiency trade; it is a straight loss. The directional consistency column, measured under a constant 5 N cantilever load, tells the same story from another angle: hexagonal and triangular deflect almost identically whichever principal axis you push on, while grid at 0.64 changes stiffness substantially depending on load direction. Full data is in the study on honeycomb, grid and triangular PLA structures under bending.
The practical rule that falls out: choose grid when the part is loaded in tension along a known axis, and choose honeycomb, triangular or gyroid when the part will be bent, or when you cannot predict which way the load will arrive. Most real functional parts fall into the second category. Model orientation interacts with this heavily, and the model placement guide covers how to align the strong axis with the load.
What Infill Density Should You Use?
Density affects strength more predictably than pattern does, and the relationship is monotonic but not linear. Testing of PLA with hexagonal infill at 25%, 50%, 75% and 100%, to ASTM D638, found that tensile strength, elastic modulus and compressive strength all rose with density, while elongation at break fell — peaking at 25% infill and dropping steadily from there.
| Density band | Use it for | Measured behavior | Shore D hardness | Watch out for |
|---|---|---|---|---|
| 10–20% | Display models, large decorative shells, fit-check prototypes | Highest elongation at break; lowest stiffness | 46 HD at 20% | Visible top-surface pillowing if the pattern is too sparse to bridge |
| 25–40% | Household parts, enclosures, light-duty brackets | Balanced stiffness and ductility | 56 HD at 40% | The default band; going higher rarely pays unless the part is loaded |
| 50–75% | Load-bearing brackets, tooling, jigs, mounts | Substantial gains in tensile and compressive strength; SEM shows fewer internal voids at 75% | 61 HD at 60% | Print time climbs faster than strength does |
| 100% | Small high-stress parts and thin sections only | Peak strength; most brittle fracture mode observed in testing | 84 HD at 80% | Trapped internal stress, warping risk, and low impact tolerance |
Density and orientation data are from Obaide and Saad's experimental study of infill density on PLA; Shore D hardness values are from the Materials study cited above, measured at 20%, 40%, 60% and 80% infill.
The elongation finding deserves emphasis because it inverts the usual assumption. Going to 100% infill does not simply make a part stronger — it makes it stronger and more brittle. The same study observed the most brittle fracture surfaces at 100% and the most ductile at 50%. If your part fails by snapping rather than by yielding, more infill is the wrong lever, and the same trap appears with filaments in vibrating mounts, where more infill does not reliably buy more fatigue life.
Why Walls Beat Infill for Most Functional Parts
If a part needs to be stronger, add wall loops before you add infill. This is geometry, not preference: in bending, material located furthest from the neutral axis contributes most to the section's resistance, and the walls sit at the outer surface while infill sits near the middle. Adding a fourth and fifth perimeter puts filament exactly where the stress is highest, whereas raising infill from 30% to 60% adds material where the stress is lowest.
Print time scales in your favor too. Perimeters are continuous extrusions at steady speed; infill at high density is a large number of short moves with direction changes at every wall intersection. Two extra walls typically cost far less time than doubling the infill percentage, and produce a better surface. Start with wall count, then set infill, and use the minimum wall thickness guide to size the shell properly. The broader set of levers is in the guide to making 3D prints stronger.
How Does Filament Choice Change the Infill Decision?
Material changes which pattern behaves well, mainly through shrinkage and stiffness. The tested data above is all PLA, and PLA is the easy case: minimal shrinkage means geometric patterns reproduce faithfully and any pattern is viable.
- PETG, ABS and ASA shrink more on cooling, so patterns with dense self-crossings can lock in internal stress and pull the part apart at the corners. Gyroid and honeycomb, which avoid path crossings, distribute that contraction more evenly.
- TPU and other flexibles need patterns that let the part move. Gyroid at low density is the standard choice; rigid crossing patterns fight the material's whole purpose.
- Carbon-fibre and glass-filled composites are abrasive, and high-density infill multiplies the extruded length that passes through the nozzle. Moderate density with a hardened nozzle extends service life. The PET-CF spool page lists the relevant handling requirements.
- Nylon and PA-CF absorb moisture and print hot, and benefit from a heated chamber more than from added infill.
Filament cost pushes the same direction as print time. Because infill volume scales roughly with density, dropping from 40% to 20% on a large part removes a meaningful share of the filament in it, which is worth weighing against the cost per spool. The filament range lists print temperature and chamber requirements per material, which is what actually constrains your pattern options.
Which Printer Capabilities Constrain Your Infill Choice?
Complex 3D infill patterns demand fast, accurate direction changes, which is a hardware question before it is a slicer question. Gyroid and honeycomb generate far more acceleration events per layer than rectilinear does, and three things determine whether your machine executes them cleanly.
Extruder type. Direct-drive extruders respond faster to the retraction and flow changes that dense patterns demand; Bowden setups lag. Every current QIDI machine uses direct drive, which is why complex patterns tend to print predictably on them.
Motion system and control. Patterns with many short segments are limited by how fast the controller can process moves. Klipper-based machines offload motion planning to a host processor, which is why they hold speed through intricate infill instead of stuttering. The Q2 quotes 600 mm/s toolhead movement and 20,000 mm/s² acceleration, and the study data above was itself generated at 300 mm/s infill speed — modern hardware is not the bottleneck it was.
Nozzle diameter. A 0.6 mm or 0.8 mm nozzle lays wider extrusions, which means fewer infill lines for the same density and faster prints, but coarser cells and over-extrusion at crossing points. If you run a large nozzle, favor non-crossing patterns like gyroid or honeycomb.
Chamber control. High-density infill deposits a lot of material into a small area, and uncontrolled temperature causes heat build-up and poor layer definition in the sparse regions around it. Machines with active chamber heating, such as the Max4 at up to 65°C, hold that environment steady across long high-density jobs. Browse the printer range if motion or chamber capability is your current limit.
How to Set Infill in Four Decisions
- Classify the part. Decorative, functional or load-bearing. This sets the density band before you open the pattern dropdown.
- Identify the load direction. Single-axis tension points to grid. Bending, or unknown direction, points to gyroid, honeycomb or triangular.
- Set walls first. Three loops as a baseline, four or five for functional parts, then set infill to the lowest value in your band.
- Test before committing to a batch. Print one part, load it the way it will actually be loaded, and adjust. Slicer previews report material and time for each configuration, so the comparison costs nothing but a few minutes — see the slicer software overview for where those figures live.
FAQs About 3D Printing Infill
What is the best infill percentage for 3D printing?
15–20% for display models and prototypes, 25–40% for everyday functional parts, and 50–75% for parts that carry real load. Testing across 25%, 50%, 75% and 100% infill in PLA showed tensile strength, elastic modulus and compressive strength all rising with density, so the right answer is set by the part's job rather than by a universal default.
Is gyroid or grid infill stronger?
It depends on how the part is loaded. Grid measured the highest ultimate tensile strength of four patterns at 60% infill in PLA, but grid is also the most directionally inconsistent of the patterns tested in bending, deflecting up to 3.94 times further than hexagonal at equal material volume. Gyroid's advantage is near-equal strength in all three axes, which matters when load direction is unpredictable.
Does 100% infill make the strongest part?
It makes the strongest part in tension and the most brittle one in impact. The same PLA testing that showed strength rising to 100% also showed elongation at break falling continuously from 25% upward, with the most brittle fracture surfaces at 100% and the most ductile at 50%. For parts that take shock loads, 50–75% with extra wall loops usually outperforms solid.
How much print time does infill add?
It varies by pattern more than most people expect. Per Prusa's slicer documentation, honeycomb can take up to twice as long as rectilinear and uses roughly 25% more material, while adaptive cubic uses about 25% less material than rectilinear and finishes sooner. Rectilinear and grid are the fastest options at any given density.
Which infill pattern uses the least material?
Adaptive cubic and lightning infill. Adaptive cubic varies its own density based on distance to the nearest wall and consumes roughly a quarter less material than rectilinear; lightning builds a branching structure that only densifies near top surfaces and saves more still. Both trade away load-bearing capacity, so use them where the interior only needs to support the top layers. More reduction tactics are in the guide to reducing 3D print material.
Why does my top surface look pitted above sparse infill?
The infill spacing is too wide for the top solid layers to bridge. Fix it by raising infill density a few points, increasing the number of top solid layers, or enabling ironing rather than by jumping to a denser pattern. The ironing guide covers the surface-finish side of the fix.
Should infill percentage change with part size?
Yes, and usually downward. Infill volume grows with the cube of scale while most load cases grow more slowly, so a large part at 40% wastes far more filament than a small part at 40% gains in strength. Scale infill down and wall count up as parts get bigger, and consider a variable-density pattern for large hollow volumes.
- What Is Infill in 3D Printing?
- Which Infill Pattern Is Strongest?
- Which Pattern Is Stiffest Under Bending?
- What Infill Density Should You Use?
- Why Walls Beat Infill for Most Functional Parts
- How Does Filament Choice Change the Infill Decision?
- Which Printer Capabilities Constrain Your Infill Choice?
- How to Set Infill in Four Decisions
- FAQs About 3D Printing Infill
- What is the best infill percentage for 3D printing?
- Is gyroid or grid infill stronger?
- Does 100% infill make the strongest part?
- How much print time does infill add?
- Which infill pattern uses the least material?
- Why does my top surface look pitted above sparse infill?
- Should infill percentage change with part size?
Recommended products