Q2
Q2
 QIDI Box
 Plus 4
 Q1 Pro
 X-Max 3


How to Fix 3D Printing First Layer Problems for a Perfect Start


A first layer problem is any defect in the initial printed layer — poor adhesion, gaps between lines, ripples, bulging edges, or curling — caused by nozzle height, bed cleanliness, bed level, temperature, or first layer speed. I fix over 90% of them with three moves: clean the plate with 90% isopropyl alcohol, correct the Z-offset in 0.02 mm steps, and drop first layer speed to 20–25 mm/s.
Here's the thing I wish someone had told me earlier: the first layer tells you exactly what's wrong if you know how to read it. Below is a symptom table that maps what you're looking at to the setting that caused it, plus the starting parameters I use per material.
What a Correct First Layer Looks Like
A correct first layer is a continuous sheet with no visible gaps between adjacent extrusion lines, a matte and slightly flattened surface, and edges that stay flat against the plate. If you can see the plate through the lines, the nozzle is too high. If the surface is glossy and translucent with ridges pushed up at the line boundaries, the nozzle is too low.
That's the whole reading. Print a 40 mm single-layer square, look at it under a light, and you've diagnosed your Z-offset in ninety seconds. Everything else in this guide is either fixing the plate underneath that layer or fixing what happens after the layer is down.
I learned to do this test print before every important job after losing a 14-hour part that detached at hour nine. A ninety-second square is cheap insurance.
First Layer Diagnostic Table
Find your symptom in the left column, then work across. Each row gives one likely cause, a way to confirm it, and the specific change to make.
| What you see | Likely cause | How to confirm | Fix |
|---|---|---|---|
| Visible gaps between first layer lines | Nozzle too far from the plate | Lines sit as separate ropes you can pick apart with a fingernail | Lower Z-offset 0.02 mm at a time until lines fuse into a sheet |
| Glossy, translucent layer with raised ridges | Nozzle too close | Nozzle leaves a scraped, burnished track; extruder may click | Raise Z-offset 0.02 mm at a time until the surface goes matte |
| Good in the centre, gappy at one corner | Bed not level or mesh out of date | Print four 20 mm squares at the plate corners and compare them | Clean the plate, re-tram or rerun auto leveling — see the bed leveling guide |
| Print detaches partway through | Surface contamination, usually skin oil | Detached area is shinier than the rest of the plate | Wash with dish soap and warm water, then wipe with 90% isopropyl alcohol |
| Corners lift off the plate | Warping — thermal contraction beating adhesion | Worse with ABS/ASA, worse on large flat parts, worse in a draft | Raise bed temperature 5–10 °C, add a brim, enclose the printer |
| Base of the print bulges outward | Elephant's foot: nozzle too low plus bed too hot | Only the first two or three layers are wider than the rest | Raise Z-offset slightly, drop bed temperature 5 °C, enable elephant foot compensation |
| Ripples or waves across the first layer | Over-extrusion, or the part fan started too early | Ripples run along the extrusion path, not across it | Set first layer fan to 0%, reduce first layer flow to 100%, slow to 20 mm/s |
| Rough, grainy first layer with pitting | Wet filament | Audible pops or hissing at the nozzle; steam visible in good light | Dry the filament before changing anything else |
| No material comes out for the first few centimetres | Nozzle primed poorly, or a partial clog | Purge line is also thin or missing | Add a longer prime line; if it repeats, clear the hot end |
| Extruder clicks during the first layer | Nozzle far too low — filament has nowhere to go | Clicking stops on the second layer | Raise Z-offset immediately; check for a bed high spot |
| First layer perfect, print falls over later | Adhesion area too small for the part height | Failure happens on tall, narrow geometry | Add a brim of 5–8 mm, or a raft for very small footprints |
| Print sticks so well it damages the sheet | Over-adhesion, common with PETG and TPU on smooth PEI | Removing the part pulls up flakes of the coating | Apply glue stick as a release layer, raise Z-offset slightly, lower bed 5 °C |
| First layer fine on the front, poor at the back | Plate warp or an uneven magnetic base | Straight edge across the plate shows a gap | Use bed mesh compensation, or replace the sheet |
Work down that list in order rather than changing three things at once. Every time I've broken my own rule, I've ended up with a printer that works and no idea why.

First Layer Settings by Material
First layer settings differ from the rest of the print in four ways: higher bed temperature, thicker layer, slower speed, and no part cooling fan. Here are the starting points I use. Always cross-check against the spool label or the manufacturer's technical data sheet, since additives change the numbers.
| Material | Bed temp (first layer) | Nozzle temp (first layer) | First layer fan | Adhesion aid |
|---|---|---|---|---|
| PLA | 55–60 °C | 205–215 °C | 0% | None needed on clean PEI |
| PETG | 70–85 °C | 230–245 °C | 0% | Glue stick as a release layer, not for grip |
| ABS / ASA | 95–110 °C | 240–255 °C | 0% | Glue stick plus an enclosure |
| TPU | 40–60 °C | 220–235 °C | 0% | Glue stick to prevent over-adhesion |
| PC and PC blends | 100–110 °C | 270–290 °C | 0% | Glue stick plus a heated chamber |
| Nylon (PA, PA-CF) | 90–110 °C | 260–290 °C | 0% | Dry filament is the main requirement |
Three settings apply across all of them:
| Setting | Value | Why |
|---|---|---|
| First layer height | 0.20–0.30 mm | A thicker first layer absorbs small leveling errors; roughly 100–150% of your normal layer height |
| First layer speed | 20–25 mm/s | Gives the extrudate time to wet the surface and bond before it cools |
| First layer line width | 100–120% of nozzle diameter | Wider lines mean more contact area per line and fewer inter-line gaps |
Prusa's knowledge base makes the same speed point from the other direction, suggesting you reduce speed to about 75% for the first three layers and raise the heatbed by 5–10 °C when a material refuses to stick. Both are cheap changes and both work.
Preparing the Plate: What Actually Matters
Bed preparation is the highest-return step in the whole process, and it is mostly cleaning. Skin oil from a single fingerprint is enough to release a part mid-print.
My routine: dish soap and warm water in the sink for the sheet, dried with a clean cloth, then a wipe with 90% isopropyl alcohol immediately before printing. Prusa recommends 90% IPA as the default for most materials, acetone only on smooth PEI and only about once a month, and specifically warns against acetone on textured or satin sheets. I ruined a textured sheet learning that one.
Surface choice matters as much as cleaning. Textured PEI grips PLA and PETG hard and releases when cool. Smooth PEI gives a glassy bottom finish but over-adheres with PETG unless you use glue stick as a release agent. A dedicated cool plate is the easy answer for PLA if you want a mirror finish without the risk. Whichever you run, the plate has to be flat — see the full bed cleaning guide for what to use on each surface type, and how to remove prints without damaging the coating.
A consistently heated bed is the other half. Bed heat keeps the polymer near its softening point long enough to bond properly, which is why unheated beds struggle with everything except PLA — we go through the physics in does a printer bed need to stay heated. Dual-sided PEI plates like the Plus 4 dual-sided PEI plate let you keep a textured side and a smooth side without swapping hardware, and the QIDI Cool Plate is the low-temperature option for PLA-heavy workflows.
Dialling In Z-Offset
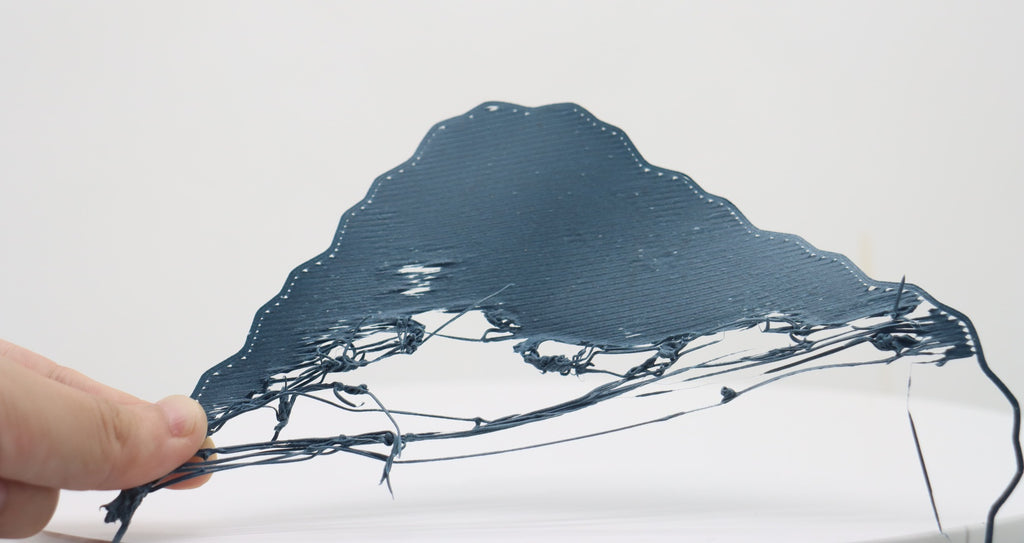
Z-offset is the distance between the nozzle tip and the build surface at the start of the print, and it is the single setting most first layer failures come down to. Adjust it in 0.02–0.025 mm increments while printing a single-layer patch, and judge by surface appearance rather than by feel.
Do it live if your printer supports baby-stepping during a print. Start a 40 mm square, watch the lines land, and nudge until they merge with no gaps and no ridges. Write the value down. Prusa's first layer calibration routine uses the same read-the-patch approach and is worth following once even if your machine isn't a Prusa, because it trains your eye.
Z-offset changes whenever the nozzle, the plate, or the probe mount changes. If you swap a nozzle and don't reset it, the first layer will be wrong by whatever the tip-length difference was. That is the most common "my printer suddenly stopped working" story I hear, and it's a two-minute fix.
Bed Leveling vs Mesh Compensation
Bed leveling makes the plate parallel to the toolhead's plane of motion. Mesh compensation maps the plate's remaining deviation so the firmware can adjust Z on the fly. They solve different problems and you generally want both.
Manual tramming with screws handles gross tilt. Automatic probing builds the mesh — Klipper's bed mesh documentation explains how the probed grid gets interpolated into live Z adjustment during the print. Probes that touch with the nozzle itself, such as loadcell and strain-gauge systems, avoid the offset drift you get with inductive sensors reading a variable distance to a sheet. Our auto bed leveling explainer compares the sensor types.
One caveat worth stating plainly: auto leveling does not set your Z-offset. It knows the shape of the bed, not how far your nozzle tip sits below the probe's trigger point. A perfect mesh with a bad offset still gives you a bad first layer.
Material-Specific First Layer Behaviour
Different polymers fail the first layer in opposite directions, so the fix depends on which one you're running.
PLA is forgiving. On a clean textured PEI sheet at 55–60 °C it sticks without help. If PLA won't stick, the plate is dirty — that's almost always the answer.
PETG and TPU over-adhere. Both bond so strongly to smooth PEI that removal can tear the coating. Use glue stick as a release layer, keep Z-offset slightly higher than you would for PLA, and let the plate cool fully before removing the part.
ABS and ASA under-adhere and warp. These materials contract measurably as they cool, and that contraction pulls the corners off the plate. A hotter bed helps; a heated chamber helps much more, because it keeps the whole part near a uniform temperature instead of letting the top cool while the base stays hot. Printers with an actively heated chamber running at 60–65 °C, such as the Plus 4, exist largely to solve this. The complete method is in how to fix warping.
Nylon and PC are moisture-driven. Both absorb water from the air fast enough to ruin a first layer within a day of being open. Dry them, and print from a dry box. Filament age and storage matter more than any slicer setting here — see how long filament lasts.

When It's the Machine, Not the Settings
If you have levelled, cleaned, and dialled Z-offset and the first layer is still inconsistent, stop tuning settings and check hardware. Four faults produce first layer symptoms that look like configuration problems.
- A partially clogged nozzle gives thin, intermittent first layer lines that look like a Z-offset problem. Test by extruding 100 mm in air — short or curling output means a feed problem. The procedure is in the nozzle jam fix.
- A warped build plate defeats leveling. Lay a straight edge across it in both directions; a visible gap in the middle means the sheet or the magnetic base is the problem.
- Play in the Z axis or bed carriage lets the gap change as the toolhead moves. Rock the bed gently by hand — any wobble at all is too much, and it will also cause the layer shifting you'll meet later.
- Uncalibrated extrusion makes every first layer either starved or over-fed regardless of height. Run through the calibration sequence before you spend another evening on Z-offset.
If the defect is still unidentified after that, the wider troubleshooting guide covers symptoms that appear beyond the first layer, and the printer range is where to look if your machine has an inherent limitation — an unheated bed or an open frame — that no amount of tuning will fix.
Frequently Asked Questions About First Layer Problems
Why is my first layer not sticking to the bed?
In order of likelihood: the plate is contaminated with skin oil, the nozzle is too far from the surface, the bed temperature is too low for the material, or the first layer is printing too fast. Wash the sheet with soap and water, wipe with 90% isopropyl alcohol, lower Z-offset in 0.02 mm steps, and set first layer speed to 20–25 mm/s.
How do I know if my nozzle is too close or too far?
Print a 40 mm single-layer square. Gaps between the extrusion lines mean the nozzle is too far away. A glossy, translucent surface with ridges pushed up between lines means it is too close. A correct first layer is matte, continuous, and slightly flattened, with adjacent lines fused into one sheet.
What should first layer height and speed be?
Use a first layer height of 0.20–0.30 mm — roughly 100–150% of your normal layer height — and a first layer speed of 20–25 mm/s. The thicker layer absorbs small leveling errors, and the lower speed gives the extrudate time to wet the surface before it solidifies.
Why does my first layer have gaps between the lines?
The nozzle is too high, so each line lands as a separate rope instead of being squashed into its neighbour. Lower the Z-offset in 0.02 mm increments until the lines merge. If lowering the offset fixes the centre but not the edges, the bed is not level or the mesh needs rerunning.
What causes elephant's foot on the first layer?
Elephant's foot is a bulge at the base caused by the nozzle sitting too low combined with a bed hot enough to keep the lowest layers soft under the weight above them. Raise Z-offset slightly, lower bed temperature by 5 °C, and enable your slicer's elephant foot compensation — Prusa documents the setting and its typical magnitude here.
Should the cooling fan be on for the first layer?
No. Set the part cooling fan to 0% for the first layer on every material. Cooling the first layer reduces adhesion and introduces thermal stress that causes corner lift. Most slicers ramp the fan in from the second or third layer, and that default is correct.
Why is my first layer rough and grainy?
Most often wet filament. Moisture boils at the nozzle and leaves a pitted, foamy extrusion — listen for popping or hissing. Dry the spool before adjusting anything else. If the filament is dry, check for over-extrusion or a nozzle that is too low and being forced to push material sideways.
Does auto bed leveling mean I never have to level again?
No. Auto leveling maps the bed's shape, but it does not set the nozzle-to-plate distance, does not compensate for a contaminated surface, and does not survive a nozzle change. You still need to set Z-offset, clean the sheet before each print, and rerun the mesh after swapping build plates.
- What a Correct First Layer Looks Like
- First Layer Diagnostic Table
- First Layer Settings by Material
- Preparing the Plate: What Actually Matters
- Dialling In Z-Offset
- Bed Leveling vs Mesh Compensation
- Material-Specific First Layer Behaviour
- When It's the Machine, Not the Settings
- Frequently Asked Questions About First Layer Problems
- Why is my first layer not sticking to the bed?
- How do I know if my nozzle is too close or too far?
- What should first layer height and speed be?
- Why does my first layer have gaps between the lines?
- What causes elephant's foot on the first layer?
- Should the cooling fan be on for the first layer?
- Why is my first layer rough and grainy?
- Does auto bed leveling mean I never have to level again?
Recommended products