How to Fix Ringing and Ghosting in 3D Prints

If you are seeing wavy ripples on your 3D prints, particularly around corners and other sharp features, you are dealing with an issue called ringing or ghosting. This common surface flaw isn't random; it is the direct result of vibrations from your printer's moving parts. The good news is that you can eliminate it methodically. This guide presents a clear, step-by-step process, starting with simple slicer settings and moving on to physical hardware checks, to help you get much smoother, cleaner prints.
Step 1: Confirm the Print Artifact is "Ringing (Ghosting)"
Before you can fix the issue, you must be certain about what you are seeing. Ringing can sometimes be mistaken for other print quality problems, and a correct diagnosis is the first step toward the right solution.
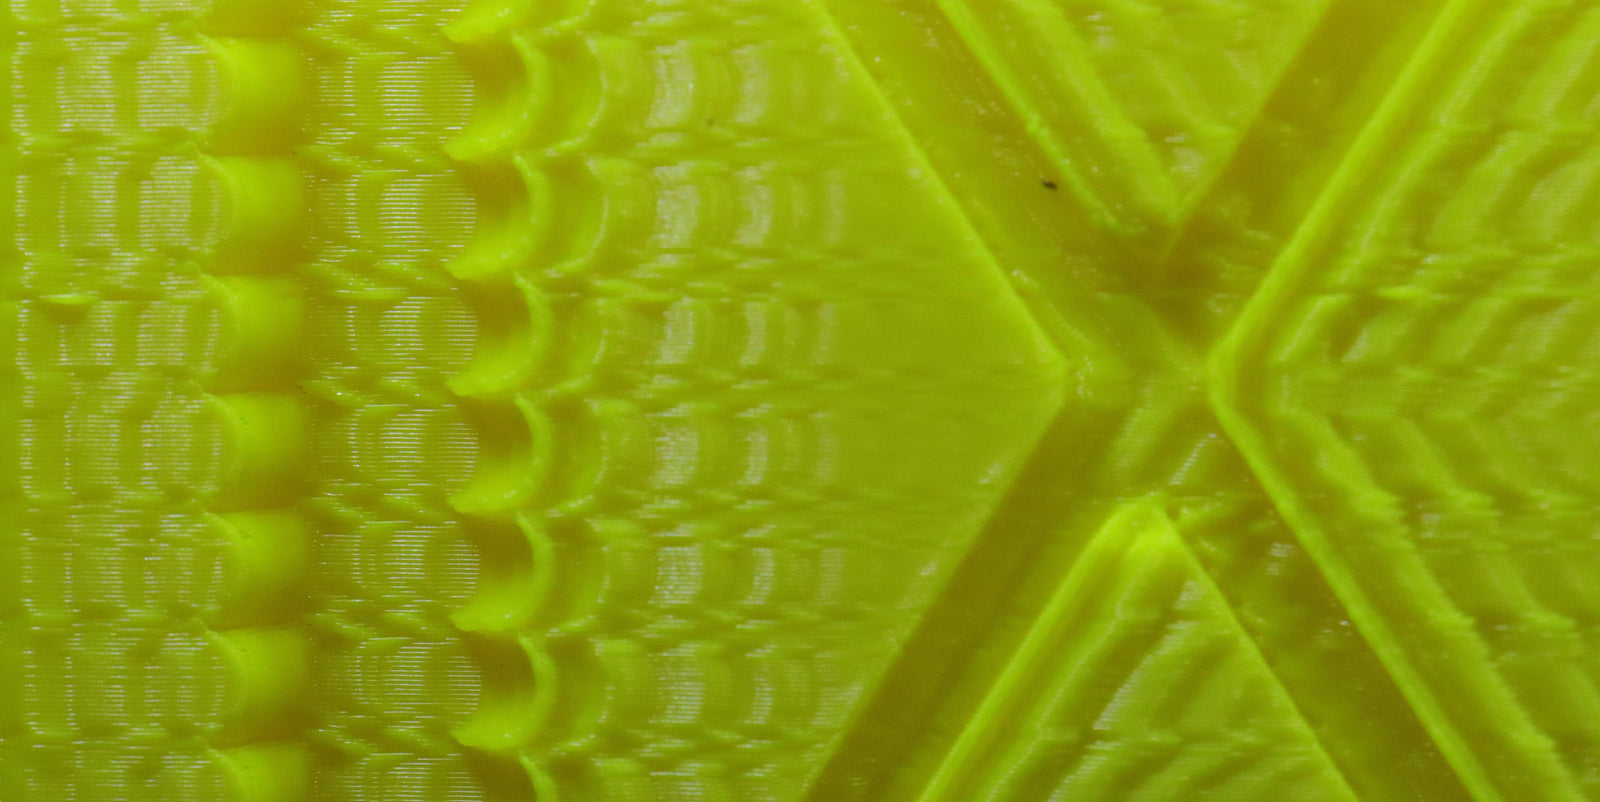
What Ringing Looks Like
Ringing, also known as ghosting or rippling, appears as a series of wavy lines on the surface of your print. You will usually see these faint ripples right after sharp features, like 90-degree corners or holes in the model. They look like echoes that fade as they move away from the feature that caused them.

The Cause: Printer Vibrations
The simple cause of ringing is mechanical vibration. Your printer's motion system, particularly the print head, has weight and momentum. When it is moving and then has to change direction suddenly, the force of that change creates tiny vibrations in the printer's frame. As the nozzle continues its path, it transfers this shaking motion onto the print, creating the ripple effect. Faster speeds and sharper direction changes will make the vibrations more noticeable.
Is it Ringing or Something Else?
Proper identification prevents you from applying the wrong fix. It is crucial to differentiate ringing from a few other common 3D printing artifacts.
- Z-Wobble: This issue presents as a consistent, repeating corkscrew or layered pattern that extends up the entire vertical height of the print. It is not linked to specific features like corners. Z-wobble is caused by a misaligned or bent Z-axis lead screw, which creates a regular, predictable deviation on each new layer.
- Inconsistent Extrusion: Problems like nozzle clogs, filament diameter variations, or a poorly calibrated extruder lead to random surface defects. These can appear as blobs, gaps, or areas of under-extrusion. Unlike the regular, feature-based pattern of ringing, these flaws are typically erratic and do not correspond to the print's geometry.
Step 2: Set Your First Line of Defense in the Slicer Software
Start with your slicer program, such as Cura or PrusaSlicer, to fix ringing the fastest. These choices tell the printer how to move, and they often work very well without changing the hardware.
1. Reduce Print Speed (Especially for Outer Walls)
Cutting down on your print speed is one of the best ways to stop ringing. When a print head changes direction, it makes more vibrations because of its high speed, but this force is greatly reduced when the head slows down. Pay attention to the "Outer Wall Speed" or "Outer Perimeter Speed" setting in your slicer because it has a direct effect on the quality of the end surface. Change the speed by a lot, like from 60 mm/s to 40 mm/s, and then print a test model to see what happens.
2. Lower Acceleration and Jerk Values
These two settings control how aggressively the printer changes speed and takes corners. Lowering them results in smoother movements that create fewer vibrations.
- Acceleration: This controls how quickly the printer gets up to speed. If it's too high, movements can be jarring. Try lowering your "Print Acceleration" values by 25-50% from the current setting.
- Jerk (or Junction Deviation): This setting determines how much the printer slows down for corners. A high jerk value is a primary cause of ringing. Try lowering the "Jerk" value (e.g., from 10 to 7). If your slicer uses "Junction Deviation," lowering that value will have a similar smoothing effect on corners.
3. Change the Print Order to "Outer Wall First"
You could also try changing the order of the prints on the wall. If you set your slicer to print the "Outer Wall First," the viewable surface is printed before vibrations from the inner walls or infill can affect it. This can help hide small rings. Keep in mind, though, that this is just a visual fix; it doesn't fix the vibration problem underneath; it just makes things look better.
Step 3: Check Your Printer's Mechanical Stability
If your software adjustments didn't completely fix the ringing, the cause is likely a physical issue with the printer itself. A wobbly frame or loose parts will amplify vibrations, overriding even the most careful slicer tuning.
1. Stabilize the Printer's Surface and Frame
Start with the printer's foundation. Make sure the machine is placed on a heavy and completely stable surface, like a sturdy workbench or even a concrete paver stone, to help absorb vibrations. Next, inspect the frame itself. Go over every screw and bolt that holds the structure together and tighten anything that's loose. Grab the top of the frame and try to rock it. If you feel any wobble or flex, find the source and secure it until the entire assembly feels rigid.
2. Inspect and Tighten the Belts
Loose belts are an extremely common cause of ringing. If the X and Y-axis belts aren't tight enough, they create slack that allows the print head to oscillate after a sudden stop or turn. Belts should be taut, making a low "twang" sound when plucked, similar to a bass guitar string. They should not be loose enough to sag, but also not so tight that they put excess strain on the motors. Use your printer’s built-in tensioners for adjustment, or manually tighten the belts at their mounting points.
3. Check for Wobble in Wheels and Pulleys
Finally, check for any play in the moving components. Firmly grab the print head and the print bed and try to wiggle them. If you feel any looseness or rocking motion, you need to adjust the eccentric nuts on the wheels. Turn the nuts in small increments, just enough to eliminate the wobble while still allowing the carriage to glide smoothly. You should also confirm that the drive pulleys on the motors and the idler pulleys on the opposite ends of the belts are fastened securely and do not wobble.
Step 4 (Advanced): Firmware and Hardware Upgrades
If you've done all the mechanical checks and still want to print faster or get an even better finish on the surface, you can change your printer's software and hardware.
1. Use Input Shaping in Firmware
This is the most modern and successful way to get rid of all ringing. High-tech firmware, like Klipper or newer versions of Marlin, has a feature called "input shaping" that cleverly stops vibrations before they can happen on the print. A small accelerometer sensor is briefly attached to the print head as part of the process. After that, you run a testing process that lets you know what the printer's own resonant frequencies are. This information is used by the software to change how it moves in real time, which stops the vibrations that cause the phone to ring. This lets you print at much faster speeds and accelerations without lowering the quality of the surface.
2. Make Hardware Modifications
Since vibrations are caused by weight and motion, making the moving parts lighter can help. Changing the print head is usually needed for this. Change to a lighter direct drive extruder or a Bowden system if you use a heavy one. In a Bowden system, the heavy extruder motor is attached to the fixed frame instead of the moving gantry. Some users change the standard V-slot wheel motion system with more rigid and precise linear rails to make the upgrade even stronger and stop the wheel from moving and bending when it doesn't need to.
Attain Smoother Prints Through Methodical Action!
Fixing ringing is a straightforward process when done in the correct order. Always start by checking your printer's physical hardware (Step 1 & 3): ensure it has a stable base, a rigid frame, and properly tightened belts. Once the machine itself is solid, then move to software (Step 2) by lowering print speed and acceleration in your slicer. For the best possible results or to enable faster printing, consider advanced solutions like Input Shaping (Step 4). By working through these stages methodically, you can successfully eliminate ringing and achieve consistently smooth surface quality on your prints.

From Fixing to Upgrading
As you've worked through these steps, you may have discovered that some components on your machine are worn, damaged, or simply not up to the task of high-quality printing. This is a natural part of the 3D printing journey. Sometimes, the solution lies in upgrading key 3d printer accessories; even a small change, like swapping to a high-performance nozzle, can make a significant difference. Don't forget the foundation of every great print: high-quality filament for 3d printer. Using one of the best 3d printer filaments ensures that your machine's perfect movements translate into flawless surfaces. And if you find yourself constantly battling the limitations of an older machine, it might be time to consider what a good 3d printer, built with stability in mind, can offer. Investing in quality components or one of the latest 3d printers is the final step towards achieving professional results.